GETTING STARTED WITH WEB VIEWING
IMPORTANT NOTICE:
This is an article covering targeting .NET Framework (4.6.2 - 4.8.x)
For .NET 8 (DotImage 11.4 and up) please see INFO:WDV (and WebCapture) In .NET 8 Whitepaper - Getting Started
We do not support targeting .NET Core 3.1 in any version
PLEASE NOTE: this paper covers version 11.4 and above of our SDK. For 11.3 (deprecated) version, click here
ALSO NOTE: Due to the large number of screenshots needed the screenshots may show slightly older versions. Please always refer to the current version of DotImage - code snippets are adjusted to reflect the latest versions where possible
When creating a new application using the WebDocumentViewer, whether you are migrating from our older web control (WebImageViewer / WebAnnotationViewer), or you are starting a new web project from scratch, there are a few steps you will need in order to get the project up and running.
We will use this document to discuss the requirements of using the WebDocumentViewer, and then walk through its creation, step by step.
WDV HISTORY
WebDocumentViewer (and its companion Thumbnail Viewer, WebDocumentThumbnailer) is a modern HTML5 compatible web viewing control. It replaces WebAnnotationViewer (WebImageViewer) and WebDocumentThumbnailer replaces WebThumbnailViewer. These older controls are still supported, but are considered legacy controls with no new features being added.
As Microsoft further deprecates 'classic asp.net web apps', these legacy controls will become more and more difficult to maintain and support. Customers using WAV/WIV and WTV are encouraged to begin migration to WDV with or without WDT.
When creating a new application using the WebDocumentViewer, whether you are migrating from our older web control (WebImageViewer / WebAnnotationViewer), or you are starting a new web project from scratch, there are a few steps you will need in order to get the project up and running.
We will use this KB to discuss the requirements of using the WebDocumentViewer, and then walk through its creation, step by step.
TECHNICAL REQUIREMENTS
Development Tools/Environment
This document and our SDK assume that you're a developer familiar with basic use of Visual Studio, IIS Express or IIS, and general web application development practices using MS Visual Studio 2013 or later. The samples will be using an HTML 5 approach in a non-MVC application targeting .NET framework 4.5.2 in a 64 bit application and using Visual Studio's built in IIS Express web server.
To ensure you're using the x64 version of IISExpress, in Visual Studio, go to Tools -> Options and then in the options menu, navigate to Projects and Solutions -> Web Projects and ensure the "Use the 64 bit version of IIS Express for web sites and projects" option is checked

NOTE: There is no major difference in using our control in MVC vs non-MVC apps - the only practical differences are that MVC likes to put scripts and css in specific locations and uses a slightly different means of interpolating paths in includes. All of this information should be able to be applied in an MVC app - just make sure you put all the markup on a single ASPX view.
ALSO NOTE: This document covers a standard ASP.NET web app, not ASP.NET Core. We do have support for ASP.NET Core targeting .NET framework (not pure .NET Core), but that is beyond the scope of this document (please see FAQ: Support for ASP.NET Core / .NET Core / .NET 5 / 6 / 7 / 8 / 9 +). The fundamental concepts of this document apply whether you are going to use ASP.NET or ASP.NET Core the client-side code is the same - the difference is in the handler (used for ASP.NET) versus the startup middleware (used by ASP.NET Core).
We will be providing examples in C#. Our SDK works with VB.NET as well, but for the sake of simplicity any .NET code will be provided in C#. You can use a converter tool such as Telerik Code converter to convert examples to VB.NET.
.NET Framework
Currently, DotImage 11.5 and up maintain a minimum .NET Framework requirement of either 3.5 (using or .NET 3.5 DLLs) or 4.6.2 or higher (using our 4.6.2 DLLs). Please note that .NET 3.0 and lower are not supported in 11.0 and newer. Likewise, .NET 4.0, 4.5, 4.5.1, 4.5.2, 4.6, and 4.6.1 are not supported in DotImage 11.5 and newer.
If you have an existing app you want to add DotImage to that targets an unsupported .NET framework, you will need to update it.
It will be necessary to make sure that your application meets the minimum framework requirements. We have not seen any conflicts with using any higher frameworks, so there should be no restrictions in terms of which .NET framework version you use, so long as it meets those minimums.
Our 11.5.0.5+ versions require minimum versions jQuery (3.5.1) and jQuery-UI (1.14.0) (see more below)
jQuery and other libraries
WebDocumentViewer (and WebDocumentThumbnailer) requires jQuery (minimum 3.5.1), and jQuery UI (minimum 1.14.0). Additionally, clipboard.js and the Raphael.js require the exact version shipped with our SDK. (Raphael library is required if using annotations.)
Our SDK ships with the minimum version of all required libraries. On SDK installation, they are placed in:
C:\Program Files (x86)\Atalasoft\DotImage 2026.2\bin\WebResources\WebDocViewer\
As of 11.5 and up, these are:
- jquery-3.5.1.min.js
- jquery-ui-1.14.0.min.js
- raphael-min.js
- clipboard.min.js
- atalaWebDocumentViewer.js
- jquery-ui-1.14.0.min.css
- atalaWebDocumentViewer.css
SDK Requirements / Versions
A brief set of instructions for downloading our SDK and activating a license will be given, but the rest of the document assumes you've installed the latest DotImage SDK (currently 2026.2.1 as of June 2026)
We do provide NuGet packages for our components, but this example will assume you've installed and activated our SDK locally. If you wish to use NuGet with our SDK, please check out our NuGet tutorial. (Please note that the NuGet tutorial is out of date.. there are outdated script links which will result in a non-working application.. Support recommends using the information in this WDV whitepaper (This current document and not the NuGet tutorial) for the time being.
If you're a licensed developer, or are actively evaluating our SDK and run into problems/questions, you are welcome to contact support.
You can make a support case in writing at our support portal.
You may also call in to support during our normal business hours
Support Hours: M - F from 8AM - 5PM EDT (New York Time)
Call us: 1-949-236-6510
STANDARD TROUBLESHOOTING
Web applications with WebDocumentViewer / WebDocumentThumbnailer have a lot of "moving parts" and troubleshooting can seem a daunting task.
There is a free third party tool that can greatly enhance troubleshooting and assist you in reporting issues to support
If you are having issues with WebDocumentViewer, problems related to the web components are best diagnosed by looking at a log of the network traffic. Most commonly a faulting application will clearly show a 500 internal server error being thrown and the full response body of that error will offer a great deal of insight into the root cause (licensing issues, and errors in the WebDocumentRequestHandler will most often show up in the 500 error response body)
We recommend Fiddler if you need to collect a log and report it to support.
Please download, install, and run Fiddler web logging
Use it to collect a log while you reproduce the issue, then save the log as a native .saz file and and attach it to your support case as a file attachment/ (please do not save as CSV or text log. The native SAZ file gives us much better access to the tools we need to help diagnose your issue)
PLEASE NOTE: you need to capture a session while NOT using SSL/HTTPS. Fiddler logs cannot see into HTTPS without enabling a special certificate which we do not recommend.. if your capture is of an HTTPS session we will not get useful diagnostic information from the log
INSTALLATION AND LICENSING
If you have not done so already, please download the latest version of Atalasoft DotImage SDK
NOTE: The current version is 2026.2.1 as of the current version of this document (June 2026) updates of the SDK happen with regularity. We work hard not to make breaking changes so this guide should be compatible with future releases. We will update the specific technical details as needed as changes arise.
If you have not done so, please log in or create an account with Atalasoft so that you can activate our SDK.
- Download and install the Atalasoft DotImage SDK
- Run the activation wizard
- If you have SDK serials for DotImage and/or WingScan use the "Activate an SDK serial for use on this machine or a server license" option and activate your serials for version 2026.2
- If you do not yet have licenses, you can select the "request 30 day evaluation"
- If you run into issues activating or require assistance, please contact support
NOTE for IIS users: The licensing above should be sufficient if you're using the built in web server in Visual Studio (IIS Express.. which this document assumes you are doing) but if you are using a local copy of IIS, then the IIS process does not run as your user name so it will not pick up your licenses. You'll need to take the extra step of copying your licenses into the application bin directory.
Assuming you have an app named SimpleWDVTestApp hosted in IIS under:
C:\inetpub\wwwroot\SimpleWDVTestApp\
Then you'd copy your licenses from:
C:\users\YOUR_USERNAME\AppData\Local\Atalasoft\DotImage 2026.2\
to
C:\inetpub\wwwroot\SimpleWDVTestApp\bin\
EXAMPLE 1
BUILDING A MINIMAL WDV APP
We're going to be creating a very minimal WebDocumentViewer (WDV) based application. We will add a WebDocumentThumbnailer (WDT)at a later stage. It's just going to open a document for viewing and allow for annotation and saving using defaults as much as possible.
While this may seem not too useful, it's the fundamental minimum you need to get the WDV running. Don't worry, we will get fancier in a bit. For now, we're going to start with the basics.
The first step will be to open Visual Studio 2022. You can use other versions of Visual Studio, however for the purpose of this project, 2022 is the platform we will be following. From there, you will create a new **empty** ASP.Net web application. Lets also target .NET 4.6.2 as our target framework, since it is the minimum version.
- Open Visual Studio 2022
- Begin by opening the Create a new project and selecting C# Windows Web -> ASP.NET Web Application (.NET Framework) and hit Next

- In the Configure your New Project dialog Name the project/solution SimpleWDVTestApp, choose an appropriate folder and target AT LEAST .NET Framework 4.6.2 and click Create

- In the following dialog for Create a new ASP.NET Web Application, we will be selecting `EMPTY` project (This tutorial assumes this - Once you've followed it this way once, you can go back and adapt to MVC or other types - but please for this tutorial select EMPTY and we'll guide you through all the steps)

- When completed, you will have an empty ASP.NET (.NET Framework 4.6.2) C# project

- Now, add references to the following Atalasoft
components:
- Atalasoft.dotImage.AdvancedDocClean.dll
- Atalasoft.dotImage.dll
- Atalasoft.dotImage.Lib.dll
- Atalasoft.dotImage.Ocr.dll
- Atalasoft.dotImage.Pdf.dll
- Atalasoft.dotImage.PdfDoc.Bridge.dll
- Atalasoft.dotImage.PdfReder.dll
- Atalasoft.dotImage.WebControls.dll
- Atalasoft.PdfDoc.dll
- Atalasoft.Shared.dll
- Make sure you're using the 64 bit .NET 4.6.2 versions from: C:\Program Files (x86)\Atalasoft\DotImage 2026.2\bin\4.6.2\x64\
Note the screenshot is pointing to 11.5 - but the fundamentals are the same

NOTE: We suggest using Browse and going specifically to `C:\Program Files (x86)\Atalasoft\DotImage 2026.2\bin\4.6.2\x64` as it ensures you'll be getting the exact right "bitness" and framework for this sample app
NOTE:You may be wondering why all the PDF and OCR
refs. This has to do with the WebControls.dll having certain dependencies. Do
not worry at this time about why, but multiple issues have arisen in cases where
customers have missed one or more of these references.
When done, the Solution Explorer References will look like this:
NOTE: Screenshot was from 11.5 so version may differ but you should use 2026.2
 In Solution explorer, add the following two new folders at the root of the
project:
In Solution explorer, add the following two new folders at the root of the
project:
SampleImages
WebDocViewer
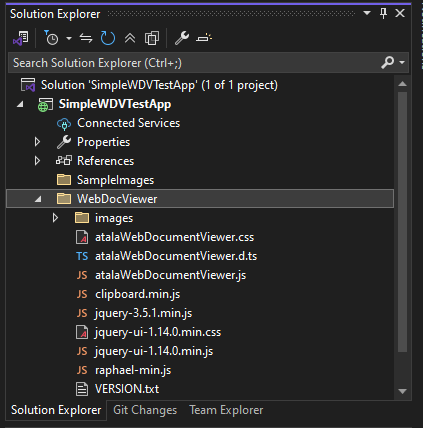
Copy the contents of:
C:\Program Files (x86)\Atalasoft\DotImage 2026.2\bin\WebResources\WebDocViewer\
into the WebDocViewer folder
Place a couple of test files we will use to test the viewer into the
SampleImages folder. For this sample code, I'll use:
- DocCleanMultipage.tif
- GettysburgAddress.tif
- DCM.pdf
- Hamlet.pdf
(download all of these HERE). If you want to use your own start document, you will need to change any text referring to DocCleanMultipage.tif to your file name
Add a new aspx page (Default.aspx)
go to Add New item -> WebForm and name
it Default.aspx

Edit the Default.aspx page
in the <header> section, add the
following: (NOTE this is the one for 11.5.0.5 and later)
    <script src="WebDocViewer/jquery-3.5.1.min.js" type="text/javascript"></script>
    <script src="WebDocViewer/jquery-ui-1.14.0.min.js" type="text/javascript"></script>
    <script src="WebDocViewer/raphael-min.js" type="text/javascript"></script>
    <script src="WebDocViewer/clipboard.min.js" type="text/javascript"></script>
    <script src="WebDocViewer/atalaWebDocumentViewer.js" type="text/javascript"></script>
    <link href="WebDocViewer/jquery-ui-1.14.0.min.css" rel="Stylesheet" type="text/css" />
    <link href="WebDocViewer/atalaWebDocumentViewer.css" rel="Stylesheet" type="text/css" />

Now, we'll need to set up the server side component. The ASHX handler that will be responsible for the back end server side calls.
Go to the solution explorer, and right click and add new item of type Generic Handler

Name it WebDocViewerHandler.ashx. (Note that it will actually create two files: WebDocViewerHandler.ashx and WebDocViewerHandler.ashx.cs - this is
expected)
That handler will have some default content. You now need to edit the WebDocViewerHandler.ashx.cs and wipe out its content and replace it all with this:
using System;
using System.Collections.Generic;
using System.Linq;
using System.Web;
using Atalasoft.Imaging.WebControls;

namespace SimpleWDVTestApp
{
    public class WebDocViewerHandler : WebDocumentRequestHandler
    {
        public WebDocViewerHandler()
        {
            /// IMPORTANT!: This is added for security purposes - it fully disables file upload
            this.FileUpload += new FileUploadEventHandler(delegate(object sender, FileUploadEventArgs e) { e.Cancel = true; });
        }
    }
}
NOTE: This is a really simple handler for now - we will be revisiting this in future sections. For now this is the minimum needed to make this work.
Ok, you've got the prerequisites all set. Now we need to give the WDV a "home" on the page...
Open Default.axpx, in the empty body ... replace this:
<body>
    <form id="form1" runat="server">
        <div>
        </div>
    </form>
</body>
with this:
<body>
    <form id="form1" runat="server">
        <div id="_toolbar1"></div>
        <div id="_containerViewer" style="width: 710px; height: 600px; display: inline-block;"></div>
    </form>
</body>
Now, need to actually initialize the component and configure it.
Go
back to default.aspx and in the header and just after the call to the scripts we included above, we need to add a manual script block
<script type="text/javascript">
    var _viewer = null;
    var _docUrl = 'SampleImages/DocCleanMultipage.tif';
    // Initialize Web Scanning and Web Viewing... this will run at startup
    $(function () {
        _viewer = new Atalasoft.Controls.WebDocumentViewer({
            parent: $('#_containerViewer'), // parent container to put the viewer in
            toolbarparent: $('#_toolbar1'), // parent container to put the viewer toolbar in
            serverurl: '/WebDocViewerHandler.ashx', // server handler url to send image requests to
            documenturl: _docUrl, // set this to non-empty string to open with an initial document
            allowannotations: true, // flag to enable annotations
            showscrollbars: true,
            forcepagefit: true
        });
    });
</script>
Alright. If you've followed everything this far, you should have a ready-to-run application. Go ahead and have Visual studio build and run. If everyting worked out right, it should look like this:

Congratulations! you've built the most basic working WebDocumentViewer!
MAKING IT BETTER
OK, so the interface is really minimal and all it does is opens a single document at startup. It has annotations available but no option to save your changes. It also (as currently configured) has no support for PDF (the base SDK support out of the box supports PNG, BMP, TIF, GIF, JPEG, and several others, but not PDF).
That's OK, we can make it better.
So, lets flesh this out.. we will start by showing you how to add support for saving, then we'll show you how to programmatically open an arbitrary file, and then we'll add support for viewing PDF in the viewer.
Add support for Saving
The WebDocumentViewer has "out of the box" saving capabilities, but the save button is hidden in our current app/view. This is because the default saving requires at a minimum that you specify a save folder in the configuration.
- First, we need to have a folder to save to. In Solution Explorer, add new folder to the root of the app and call it "Saved"

- Now, we need to modify the viewer configuration to add a savepath value of 'Saved/' .. so the viewer config will look like this:
_viewer = new Atalasoft.Controls.WebDocumentViewer({
   parent: $('#_containerViewer'), // parent container to put the viewer in
   toolbarparent: $('#_toolbar1'), // parent container to put the viewer toolbar in
   serverurl: '/WebDocViewerHandler.ashx', // server handler url to send image requests to
   documenturl: _docUrl, // set this to non-empty string to open with an initial document
   allowannotations: true, // flag to enable annotations
   savepath: 'Saved/', // relative url to save annotation data to
   showscrollbars: true,
   forcepagefit: true
})
That's it for basic saving. If you run your app again, you should now see a save option on the toolbar.. if you add some annotations to the document and then hit save.. it will save a copy to the Saved/ directory with the same name as the original and will save an XMP sidecar file with the annotations.
Look in Saved and you should see a DocCleanMultipage.tif and DocCleanMultipage.xmp file now in the Saved directory
This is the super basic out of the box saving.. We could have just included the savepath in the initial config and it would already have been there, but it's important to let you know that the save button does not show automatically unless that option is set. When we get to advanced functionality, we will revisit saving to do something slightly more useful.. like saving to arbitrary locations or even preparing a save to send to a database or web service.
Open Files Programmatically
This next upgrade, we will add buttons to open some additional files. We already had you copy some test files to SampleImages before. If you haven't done so, add a directory called SampleImages to the root of the project and add the files from SampleImages.zip to that directory.
For this example we are going to make super simple HTML buttons. You can use any valid means of triggering programmatically, using third-party controls etc.. the only key issue is that you must never cause / call a postback. The WebDocumentViewer is essentially a Single Page Application (SPA) pattern and works with asynchronous callbacks. Causing a postback (resubmitting/loading the page) completely starts over from scratch and loses all changes.
We will add a button to open a different document (Gettysburgaddress.tif) as well as one to open the document that we already have present (DocCleanMultipage.tif) so you can see the proper method to implement a programmatic OpenURL. Optionally, we will disable the initial document load so that your viewer loads empty and doesn't have any document until it's loaded.
The signature of the OpenUrl command is:
_viewer.openUrl(DocumentUrl,
AnnotationsUrl, CallbackFunction);
DocumentUrl
A string containing the relative path (within the web app) of the document to open.
AnnotationUrl (optional)
A string containing the relative path (Within the web app) of the annotations file to open.
If this is left blank, then no annotations are opened and the current annotations (if any) are preserved. This can cause issues if you open a document with less pages in it than you have of annotations (you had a 3 page doc open with annotations on all pages then you openUrl(NewOnepageDoc);.. this would leave the 3 pages of annotations with the unreachable 2nd and 3rd pages hanging out awkwardly.
If this is set to an empty string ('') then it will tell the control to destroy any existing annotations (so load fresh without any annotations).
CallbackFunction (optional)
A JavaScript function that will be called after the openUrl is completed. This is useful for situations where you need to take some specific action ONLY AFTER the new document loads.. for instance, say you are going to load a 2 page doc and want it to open "to the last page"...
You can not do this:
_viewer.openUrl('my2pageDoc.tif');
_viewer.showPage(1); // page indices are zero indexed so 1 is the second page
If you try, it will error because the openUrl does not hold execution.. so _viewer.showPage will call before the document is open and has the page..
Instead, you'd use the callback like this:
_viewer.openUrl('folderFor/my2pageDoc.tif', null, function() {_viewer.showPage(1);});
Note that the null is required as a placeholder .. you must either provide an annotations url or give it null because the THIRD argument is the callback, not eh second.. if you wanted to open a new document and clear annotations too and then scroll to the second page, the code would be:
_viewer.openUrl('folderFor/my2pageDoc.tif', '', function() {_viewer.showPage(1);});
Now, calling raw JavaScript is not really "a thing" it's usually called as part of some action. Maybe you have a third party grid or tree control or maybe you have some other code entirely.. either way you normally would be binding to some kind of onclick action or other. So for this example we will make HTML buttons.
This is actually a good excuse to talk about postbacks. If you make an html button or (even worse) an ASP:Button, and do not take steps to prevent a callback, your button will break the viewer/ make it do undesirable things.
This is because the viewer is following an SPA pattern and uses asynchronous Ajax calls to the back end.. a postback completely destroys all data on the control as it requests a reload.
To avoid callbacks, we must ensure any onclick event is done correctly.. that it returns false (a signal to the browser to NOT do a postback)
So, to put this all together, lets add a button for each test file (modify the html form tag to add the buttons right above the viewer divs:
<form id="form1" runat="server">
    <input type="button" id="btn_open_DocCleanMultipage" value="Open DocCleanMultipage"
     onclick="_viewer.openUrl('SampleImages/DocCleanMultipage.tif', ''); return false;" />
    <input type="button" id="btn_open_GettysburgAddress" value="Open GettysburgAddress"
     onclick="_viewer.openUrl('SampleImages/GettysburgAddress.tif', ''); return false;" />
    <input type="button" id="btn_open_dcm" value="Open DCM (pdf)"
     onclick="_viewer.openUrl('SampleImages/DCM.pdf', ''); return false;" />
    <input type="button" id="btn_open_hamlet" value="Open Hamlet (pdf)"
     onclick="_viewer.openUrl('SampleImages/Hamlet.pdf', ''); return false;" />
    <div id="_toolbar1"></div>
    <div id="_containerViewer" style="width: 710px; height: 600px; display: inline-block;"></div>
</form>
This will make your Default.aspx look a bit like this:

and when you run it you will have some (admittedly ugly, but functional) buttons at the top of the page..

Well, the first two work but when you try and open the PDFs the viewer will go blank... So that brings us to the final improvement for this app..
Add PDF support
PDF is a very common file format and DotImage has a lot of really awesome PDF related tools and features. However, PDF viewing is not part of the base SDK.. it requires an add-on license for our PdfReader component. It also requires that you explicitly add PDF support to applications you want to be able to view PDFs
You may have noticed in the earlier stages, we added references to several PDF related (Atalasoft.dotImage.Pdf.dll, Atalasoft.dotImage.PdfDoc.Bridge.dll, Atalasoft.dotImage.PdfReader.dll, Atalasoft.PdfDoc.dll). We did so because the WebControls DLL requires them as dependencies.. because these DLLs are integral to support for text searching for PDFs .. an "out of the box" feature of the control we won't be directly covering in this paper.
So, first thing, if you have not added those references please revisit the earlier section on adding references to the DLLs we need. This will assume you have either a valid license for our Pdf reader component or you have an active, valid evaluation license that includes the PdfIum license (in 11.0 and newer, your PdfReader add-on license will create an Atalasoft.dotImage.PdfIum.lic file as this is our new PDF engine in 11.0 and newer)
Now we need to add support for PDF.. this will be the first actual server-side code we need to modify past the original creation of the WebDocViewerHandler.ashx.
- Open the WebDocViewerHandler.ashx.cs file in your editor
- Up in the using statements, add the following two entries:
using
Atalasoft.Imaging.Codec;
using Atalasoft.Imaging.Codec.Pdf;
- Inside the public class WebDocViewerHandler : WebDocumentRequestHandler, but NOT inside the public WebDocViewerHandler(), add a new static constructor static WebDocViewerHandler() { }
- Inside that static constructor, add a new PdfDecoder to the RegisteredDecoders.Decoders collection .. like this:
RegisteredDecoders.Decoders.Add(new PdfDecoder() { Resolution = 200 });
The full updated handler will now look like this:
using System;
using System.IO;
using System.Web;
using Atalasoft.Imaging.Codec;
using Atalasoft.Imaging.Codec.Pdf;
using Atalasoft.Imaging.WebControls;
namespace SimpleWDVTestApp
{
    public class WebDocViewerHandler : WebDocumentRequestHandler
    {
        static WebDocViewerHandler()
        {
            RegisteredDecoders.Decoders.Add(new PdfDecoder() { Resolution = 200 });
        }
        public WebDocViewerHandler()
        {
            /// IMPORTANT!: This is added for security purposes - it fully disables file upload
            this.FileUpload += new FileUploadEventHandler(delegate(object sender, FileUploadEventArgs e) { e.Cancel = true; });
        }
    }
}
Believe it or not, that's all it takes.. if you're licensed for PDF reader and have those dlls referenced and have this in your handler and run your app, the PDF open buttons should now work.

EXAMPLE 2
BUILDING A MINIMAL WDV APP WITH THUMBNAILS (WebDocumentThumbnailer)
Up to this point, the whole setup has been bare minimum. This is intentional as we wanted to show you the minimum needed to just get WebDocumentViewer up and running and then add a bit of info for the most common first questions (how do I open other documents?, how do I save?, how do I add PDF support?).
There are MANY more things we could do from here, and in a future WDV whitepaper covering more advanced topics, we'll delve into those a bit more. However, many customers want /need a Thumbnail based viewer for their WDV.. they want a thumbnail control to let users see/scroll a quick high level presentation of their document and use it to trigger viewing of the selected page on the main big viewer.
So, we're going to start from scratch again to show you how to build an app using WebDocumentViewer (WDV) with WebDocumentThumbnailer (WDT). We won't be going quite as slowly (less screenshots) because most of this is review from the previous.. we will be concentrating here on some of the subtle changes needed to get that thumbnail viewer running and connected to the viewer.
Many of the advanced use cases that will be covered in more advanced papers will start from this base WDV with WDT sample app.
- Open Visual Studio 2013
- Create a new project a C# ASP.NET web application targeting .NET framework 4.5.2 (or higher if you wish, but NOT .NET Core)
- Name the project/solution SimpleWDVWDTTestApp
- We will be setting it up for EMPTY project
- Now, add references to the following Atalasoft components:
- Atalasoft.dotImage.AdvancedDocClean.dll
- Atalasoft.dotImage.dll
- Atalasoft.dotImage.Lib.dll
- Atalasoft.dotImage.Ocr.dll
- Atalasoft.dotImage.Pdf.dll
- Atalasoft.dotImage.PdfDoc.Bridge.dll
- Atalasoft.dotImage.PdfReder.dll
- Atalasoft.dotImage.WebControls.dll
- Atalasoft.PdfDoc.dll
- Atalasoft.Shared.dll
- Make sure you're using the 64 bit .NET 4.5.2 versions from:
C:\Program
Files (x86)\Atalasoft\DotImage 11.4\bin\4.5.2\x64\
- In Solution explorer, add the following three new folders at the root of the project:
- SampleImages
- Saved
- WebDocViewer
- Copy the contents of:
C:\Program Files (x86)\Atalasoft\DotImage 11.4\bin\WebResources\WebDocViewer\
into the WebDocViewer folder
- Place a couple of test files we will use to test the viewer into the SampleImages folder. For this sample code, I'll use:
- DocCleanMultipage.tif
- GettysburgAddress.tif
- DCM.pdf
- Hamlet.pdf
(download all of these HERE).
If you want to use your own start document, you will need to change any text referring to DocCleanMultipage.tif to your file name
- Add a new aspx page (Default.aspx)
go to Add New item
WebForm
name it Default.aspx
- Edit the Default.aspx page
in the <header> section, add the following:
    <script src="WebDocViewer/jquery-3.5.1.min.js" type="text/javascript"></script>
    <script src="WebDocViewer/jquery-ui-1.14.0.min.js" type="text/javascript"></script>
    <script src="WebDocViewer/raphael-min.js" type="text/javascript"></script>
    <script src="WebDocViewer/clipboard.min.js" type="text/javascript"></script>
    <script src="WebDocViewer/atalaWebDocumentViewer.js" type="text/javascript"></script>
    <link href="WebDocViewer/jquery-ui-1.14.0.min.css" rel="Stylesheet" type="text/css" />
    <link href="WebDocViewer/atalaWebDocumentViewer.css" rel="Stylesheet" type="text/css" />
- Now, we'll need to set up the server side component. The ASHX handler that will be responsible for the back end server side calls.
- Go to the solution explorer, and right click and add new item of type Generic Handler
- Name it WebDocViewerHandler.ashx. (Note that it will actually create two files: WebDocViewerHandler.ashx and WebDocViewerHandler.ashx.cs - this is expected)
- replace all the default code of that handler with this:
using System;
using System.IO;
using System.Web;
using Atalasoft.Imaging.Codec;
using Atalasoft.Imaging.Codec.Pdf;
using Atalasoft.Imaging.WebControls;
namespace SimpleWDVTestApp
{
    public class WebDocViewerHandler : WebDocumentRequestHandler
    {
        static WebDocViewerHandler()
        {
            RegisteredDecoders.Decoders.Add(new PdfDecoder() { Resolution = 200 });
        }
        public WebDocViewerHandler()
        {
            /// IMPORTANT!: This is added for security purposes - it fully disables file upload
            this.FileUpload += new FileUploadEventHandler(delegate(object sender, FileUploadEventArgs e) { e.Cancel = true; });
        }
    }
}
- OK, you've got the prerequisites all set. Now we need to give the WDV and WDT a "home" on the page... so, down in the empth body ... replace this:
    <form id="form1" runat="server">
    <div>

    </div>
    </form>
with this:
    <form id="form1" runat="server">
        <div style="width: 900px;">
            <div id="_toolbar1"></div>
            <div id="_containerThumbs" style="width: 180px; height: 600px; display: inline-block;"></div>
         <div id="_containerViewer" style="width: 710px; height: 600px; display: inline-block;"></div>
        </div>
    </form>
- Now, need to actually initialize the components and configure them. Unlike the previous app, we have two components: WebDocumentViewer AND WebDocumentThumbnailer. The WDT needs to be linked to the viewer, so we must ensure we configure the viewer first.
- Go back to default.aspx and in the header and just after the call to the scripts we included above, we need to add a manual script block
<script type="text/javascript">
        var _viewer = null;
        var _thumbs = null;
        var _docUrl = 'SampleImages/DocCleanMultipage.tif';
        // Initialize Web Viewing... this will run at startup
        $(function () {
         _viewer = new Atalasoft.Controls.WebDocumentViewer({
             parent: $('#_containerViewer'), // parent container to put the viewer in
             toolbarparent: $('#_toolbar1'), // parent container to put the viewer toolbar in
             serverurl: '/WebDocViewerHandler.ashx', // server handler url to send image requests to
             allowannotations: true, // flag to enable annotations
             savepath: 'Saved/', // relative url to save annotation data to
             showscrollbars: true,
             forcepagefit: true
         });
         _thumbs = new Atalasoft.Controls.WebDocumentThumbnailer({
             parent: $('#_containerThumbs'), // parent container to putthe thumbnails in
             serverurl: '/WebDocViewerHandler.ashx', // server handler url to send image requests to
             documenturl: _docUrl, // document url relative to the server handler url
             allowannotations: true, // flag to enable annotations
             viewer: _viewer, // link actions to the _viewer so they open the same doc
             allowdragdrop: true,
             showscrollbars: true
         });
        });
    </script>
Alright. If you've followed everything this far, you should have a ready-to-run application. Go ahead and have Visual studio build and run. If everyting worked out right, it should look like this:

Congratulations! you've built the most basic working WebDocumentViewer With WebDocumentThumbnailer!
We've taken the liberty of enabling saving AND of enabling drag drop - so try this - go ahead and gran an image from the thumb viewer and drag it to a different position relative to other pages.. say take page 1 and move it below page 2... the thumbnail viewer will update, the main viewer will update, AND if you save.. the saved image will match the order in which you placed them in the viewer!
MAKING IT BETTER
If you notice, we didn't just drop in the buttons from our previous example. The openUrl works ALMOST the same but there's a key difference we wanted to highlight explicitly.. When using WDV with WDT, you do NOT openUrl on the _viewer (WDV) you must openUrl on the WDT (_thumbs)
You might have even noticed that we slipped something in there already - when we gave you the viewer initialization notice how the updated WDV initialization removed the documenturl and we added it instead to the _thumbs viewer? this was intentional.
So, knowing what you know now, it's really easy - we can add the same buttons from before and just change _viewer to _thumbs ...like this:
<form id="form1" runat="server">
    <input type="button" id="btn_open_DocCleanMultipage" value="Open DocCleanMultipage"
        onclick="_thumbs.openUrl('SampleImages/DocCleanMultipage.tif', ''); return false;" />
 <input type="button" id="btn_open_GettysburgAddress" value="Open GettysburgAddress"
     onclick="_thumbs.openUrl('SampleImages/GettysburgAddress.tif', ''); return false;" />
 <input type="button" id="btn_open_dcm" value="Open DCM (pdf)"
     onclick="_thumbs.openUrl('SampleImages/DCM.pdf', ''); return false;" />
 <input type="button" id="btn_open_hamlet" value="Open Hamlet (pdf)"
     onclick="_thumbs.openUrl('SampleImages/Hamlet.pdf', ''); return false;" />
    <div style="width: 900px;">
        <div id="_toolbar1"></div>
        <div id="_containerThumbs" style="width: 180px; height: 600px; display: inline-block;"></div>
        <div id="_containerViewer" style="width: 710px; height: 600px; display: inline-block;"></div>
    </div>
</form>
SAMPLE APP DOWNLOADS
It is our hope that you've been following along with the tutorial and have successfully built your solution. However, if you've run into issues or if you want a working reference app, we've implemented both the SimpleWDVTestApp and SimpleWDVWDTTestApp for you to download and run if needed. They also make great test harnesses for any experimental WDV / WDT code you want to try out... letting you start from a known-working application.
CONCLUSION
In many respects we have barely even scratched the surface of the WebDocumentViewer and WebDocumentThumbnailer. This paper was meant as a very basic getting started that will serve you well as a step by step guide to just getting the viewer set up and working. Atalasoft support engineers use a very similar base "boilerplate" app that we used as our inspiration for this demo nearly every day .. as a quick test harness / repro base solution to quickly test customer cases/issues and to test out various coding ideas having to do with WDV/ WDT.
In order to keep this document to a manageable size, we will end here for now. There are plans in the works for more advanced tutorials.. all of those will focus on the starting apps we've done here.
If you're looking for a getting started for WingScan .. our Web Scanning SDK, please see INFO: WingScan Whitepaper - Getting Started with Web Scanning
v005 - 2026/06/25 - TD